How to Create a Cyberpunk Effect in Photoshop
Learn how to create a popular & cool cyberpunk effect in Photoshop. This tutorial will break down the techniques that you need to learn to add cyberpunk coloring to your images by adding pink & blues, cyan & reds, or any combination of colors that you can think of. Not only you’ll learn how to replicate a futuristic cyberpunk effect but you’ll learn how to choose & prepare images for this effect.
View popular Photoshop Actions here →
Tutorial Resources
Unsplash (Street Image)

Cool Cyberpunk Effect Tutorial for Photoshop CC
Step 1
First, download the image from the resource section and open it in Photoshop. Go to the top menu, select File > Open, to open the sample image. For this effect, I recommend using busy street images from South Korea, Hong Kong, China, or Japan. The reason why I am recommending images from these places is that not only they have busy street but neon signs and bright coloring makes street images more perfect for this effect. Not need to mention night time mood is recommended as well.
Here you can see I opened the image in Photoshop:

Step 2
Notice the image is a little bit on the side of underexposure as it is a night scene. You want the image exactly on the side of underexposure because we are going to lighten up the image by adjustment layers, painting lights, and using Camera Raw. So you don’t want an image which is already bright because that will ruin final results as we’ll lose details in highlights.
I decided to increase the brightness of the image. Go to Layer > New Adjustment Layer > Curves and you can see in the settings below that I added a point in the middle to affect midtones of the image.
Use the settings shown in the image.

Step 3
I added a base coloring to the image using a Color Balance adjustment layer. Just trying to find out the best possible color combination here by adding colors to Midtones & Highlights.
You can create a Color Balance adjustment by going to Layer > New Adjustment Layer > Color Balance and then input the following values:

Step 4
We’ll apply Adobe Camera Raw Filter to edit the image and this is a key step when it comes to adding cyberpunk vibes to your images as it has a lot more controls to start with. First, create a merged layer of all layers by pressing CTRL + ALT + SHIFT + E. Right-click on the image and convert it to “Smart Object”.

Go to Filter > Adobe Camera Raw. I dropped the temp to -15 to reduce yellow coloring. Also, I dropped shadows level to -100 and increased the white levels to pop them up. The rest of the settings depends on you and if you want the same results as shown in this tutorial just input the settings shown below.

Next, I went to HSL and I changed the Hue of Blue, Aqua, Yellow, & Pinky-Purple. I didn’t play with saturation much but only reduced the saturation of Purple to -73. I increased the Luminance of Aqua to +23.
So much to understand here but I am aiming for cyan & pink coloring. Remember these settings won’t work on every image & you might want to play around differently to achieve the coloring that you want.

Now, I went to Split toning to add hot pinks to highlights and purple to shadows of the image.

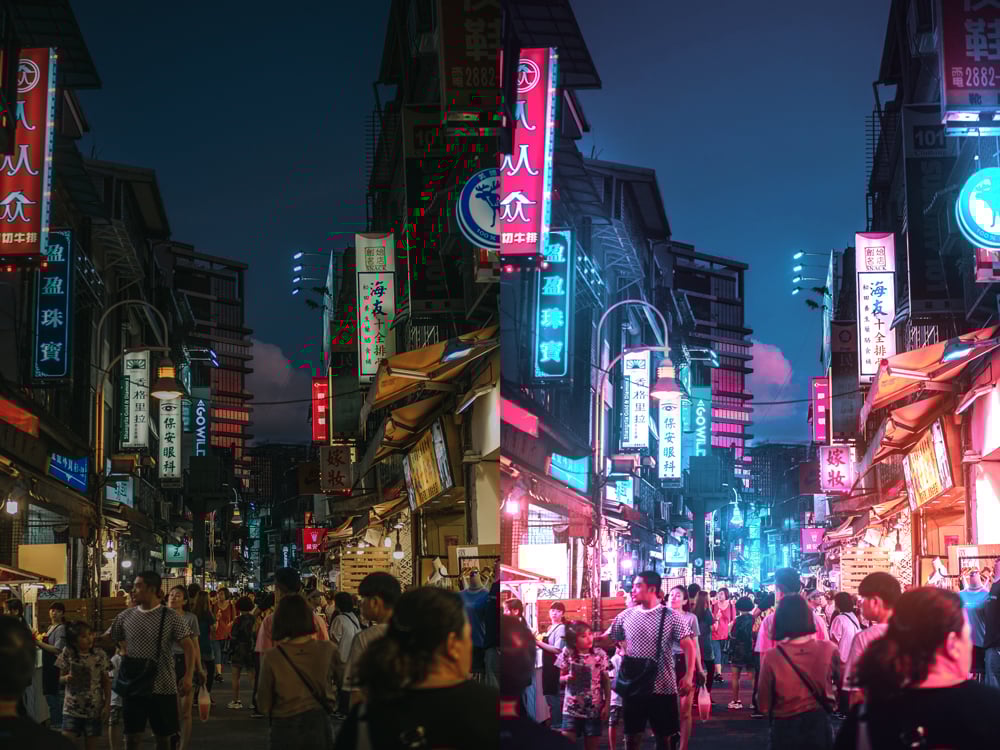
You can see that dreamy & cyberpunk vibes have been added to the image and the only thing is lacking is neon lighting.

Step 5
Go to Layer > New Adjustment Layer > Selective Color and use the following settings to reduce the saturation of reds from the image.

You can compare the results here before & after using Selective Color adjustment:

Step 6
It’s time to create magic by painting lights. I’ll show you a little trick to paint light in your images and trust me this trick will change the way you paint lights & glows.
Press CTRL + SHIFT + N to create a new layer and name it “Light Paint”. Use a soft round brush to paint light dots on the image, I chose cyan & yellow color to paint light as these are the colors that happens to be most on the image right now. Make sure when you paint light vary the brush size, opacity & flow to get the best possible results. Do it very carefully and don’t overdo it. Also, paint light on the signboards, or wherever you see a light source.
Here you can see how I painted the lights:

Change the blending mode to Linear Dodge and you can see we have lit up the lights of the image.

Step 7
Black Layer lighting technique is my favorite lighting technique to create light effects and I have mastered it. This technique involves using a black layer with the combination of Color Dodge mode. First, create a new layer and fill this layer with black color. Once you have created a black layer change the blending mode to Color Dodge.
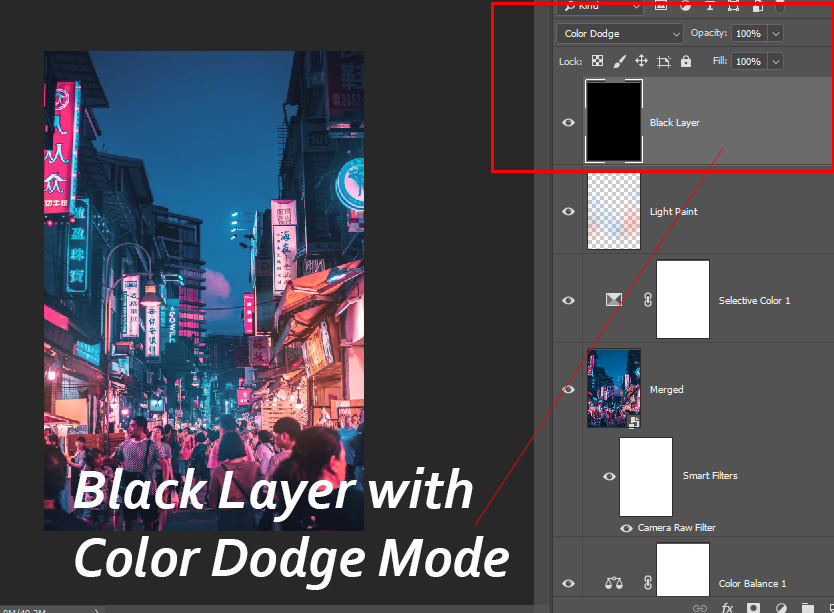
Now all you have to do is pick a soft round brush and using a white color & paint over those parts exactly where you painted the light in the last step. As you brush over these parts you’ll notice beautiful natural looking glows start to appear around the image. Also, it is highly recommended when you paint on a black layer make sure the opacity and flow of the brush must be around 20%-30% or less to avoid harsh contrast in your image.
Here you can see how I painted the glow:

Also, notice that I added a layer mask to the black layer so I can reduce the intensity of light wherever I think I have overdone it. I just need to paint using a black color on the mask to hide the light effect.
Results so far:

Next time you want to paint light makes sure to use my black layer lighting technique.
Step 8
In the end, I used a Color Balance adjustment layer to bring back reds and yellows to the image. You can see the settings below and I reduced the opacity to 50% to minimize the effect of Color Balance.

Here are my final results:

I hope you enjoyed the tutorial. Give it a go and let us know in the comment section below how this tutorial has helped you till then keep Photoshopping!!!


Thanks Joyce.
Written tutorials are so few and far between, but for someone like me-trying to understand the processes, and to learn new techniques–these tutorials are invaluable.
You wrote straight to the point so as not to cloud the issue (an almost lost art) and created a very understandable and well-written tutorial,