How to Create a Glitch Effect in Photoshop CC
Special effects are always fun to create in Photoshop and the glitch effect is one of the most popular special effects in images. In this tutorial, you’ll learn how you can mimic the glitch effect in Photoshop as I break down tools & techniques to create this popular effect. I’ll show you how you can quickly replicate this effect with the use of brushes and blending options.
Not only will you learn how to create your own custom glitch effect from scratch but you’ll see how to easily customize and give your own taste to this effect. So without any further ado let’s get into it!
View popular glitch effects on the marketplace →
Tutorial Resources
Step 1
Open the cyclist image in Photoshop by selecting File > Open and open it up in Photoshop. I am using a sports image here and I think using a sports image with this effect kinda compliment it because a movement in your images looks better with glitch effect. You can also create this effect on any of your images but with a sports image, it looks much better.
Here is the image opened in Photoshop and if you want to follow along with the tutorial you can download the image from the links mentioned above.

Step 2
I am going to duplicate the image by pressing CTRL + J and we’ll use blending options to create the anaglyph effect or 3D anaglyph effect as it is the base of glitch effect.
Here you can see I have duplicated the image:

Step 3
To mimic anaglyph effects we need to use channels of layer and you can do this by accessing the Blending Options of a layer. Right-click on the image and then choose Blending Options as shown in the below image.
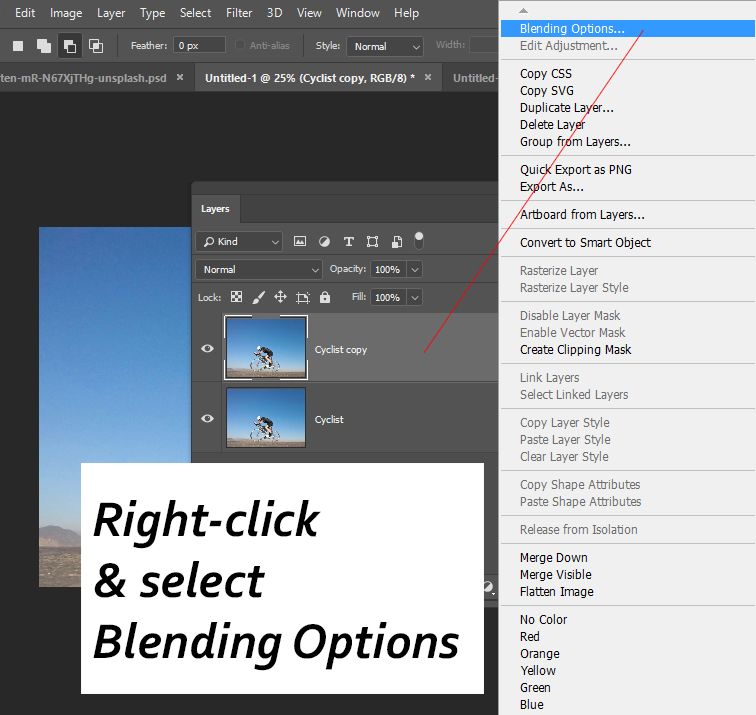
Once you click on the Blending Options this will bring up the Blending Options dialog box and you’ll see there are a lot of options. Now what you wanna do Uncheck the Red Channel under the Advanced Blending options and this will disable the red channel of the layer. Also, make sure when you do that “Cyclist Copy” layer is selected otherwise you won’t be able to create 3D effect.
Here you can see how you can uncheck the red channel:

To start seeing the glitch effect all you have to do is move the “Cyclist Copy” layer left or right to see the effect in action. I selected the Move Tool (V) and moved the layer to left.
You can see the 3D effect in the below image:

Step 4
Now we will add linear distortion to replicate distortion effect. This step is a key to improve the glitch effect further and there are a lot of techniques that can do this. You can do this by making selection manually using Rectangular Marquee Tool (M) and then nudging the selection left or right but this is time-consuming. You can also use Filters such as Wave, Shear, or Zig Zag filter but with filters you don’t have manual control.
I am using some glitch brushes to make the linear distortion in no time and this is a much faster way to create linear distortion.
First, create a new layer by pressing CTRL + SHIFT + N and name it “Cloning”.
Select the Clone Stamp Tool (S) and set the Sample settings to Current & Below.

Now once the Clone Stamp Tool is set, download the glitch brushes from the link mentioned in the resource section. Import them in Photoshop and select one of the Glitch brush I’ve selected Glitch #1, now hold down the ALT key to sample a source (sample cyclist image parts) to begin cloning.
Also, make sure you clone on the right of the image because we moved the layer to left so there is a repetitive portion on the right of the image which needs to be cloned. You just need to sample and clone by applying brush strokes on the image to create distortions.
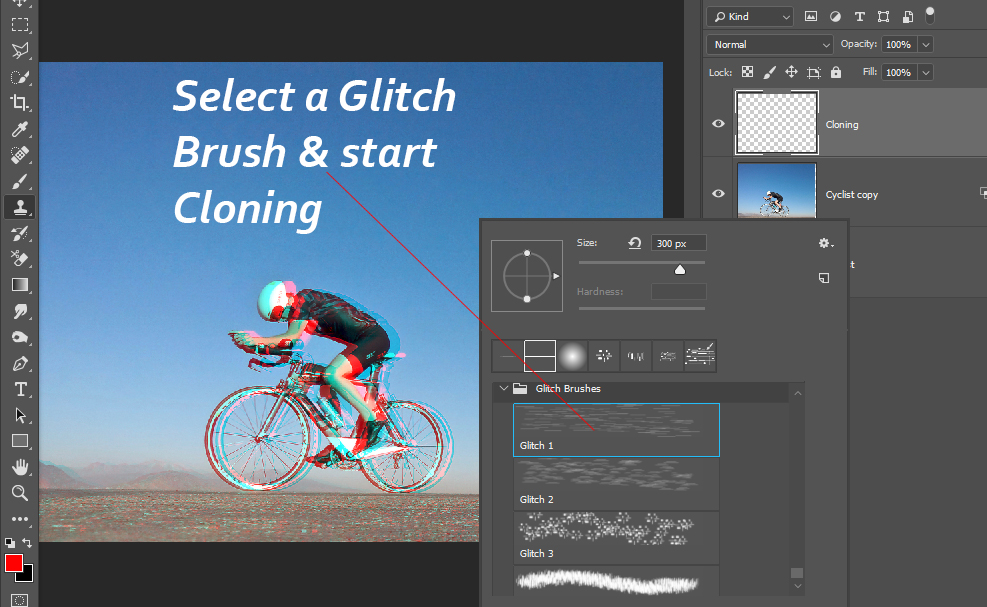
Here you can see how I am doing the cloning to create linear distortion much faster than selecting and moving layer parts. You just need to sample and clone by applying brush strokes on the image to create distortions.

Step 5
You can play around with other brushes and keep cloning until you are happy with the results. In my case, I used #3 and #5 brush to add more distortions to the image.

Here are my results so far:

Step 6
Now we’ll create a line pattern and we’ll apply it across the entire image. I am going to show you a little trick on creating a line pattern texture in Photoshop but you can also use textures here if you want to.
Create a new layer and name it “Lines”. Fill this layer with white color, you can do this by selecting Edit > Fill and then choose “White” in the Content-Aware.
Once you filled the layer with white color and convert it to “Smart Objects” by right-clicking on it and choose “Convert to Smart Object”. A little tip is always use Smart Objects before applying filters to your layers so you can edit them later.

Once the layer is filled with white color, make sure the foreground color is set to white, you can press (D) to set the foreground/background to black/white and then press (X) switch color & this will set the foreground color to white.
Now go to Filter > Filter Gallery > Halftone Pattern and apply it with the following settings:

Once you applied Halftone filter, change the blending mode to Overlay and I reduced the opacity to 47%. Here you can see we have a line pattern across the entire image and of course you can play around with Halftone’s filter settings, blending modes, and opacity slider to get the best possible results.

Step 7
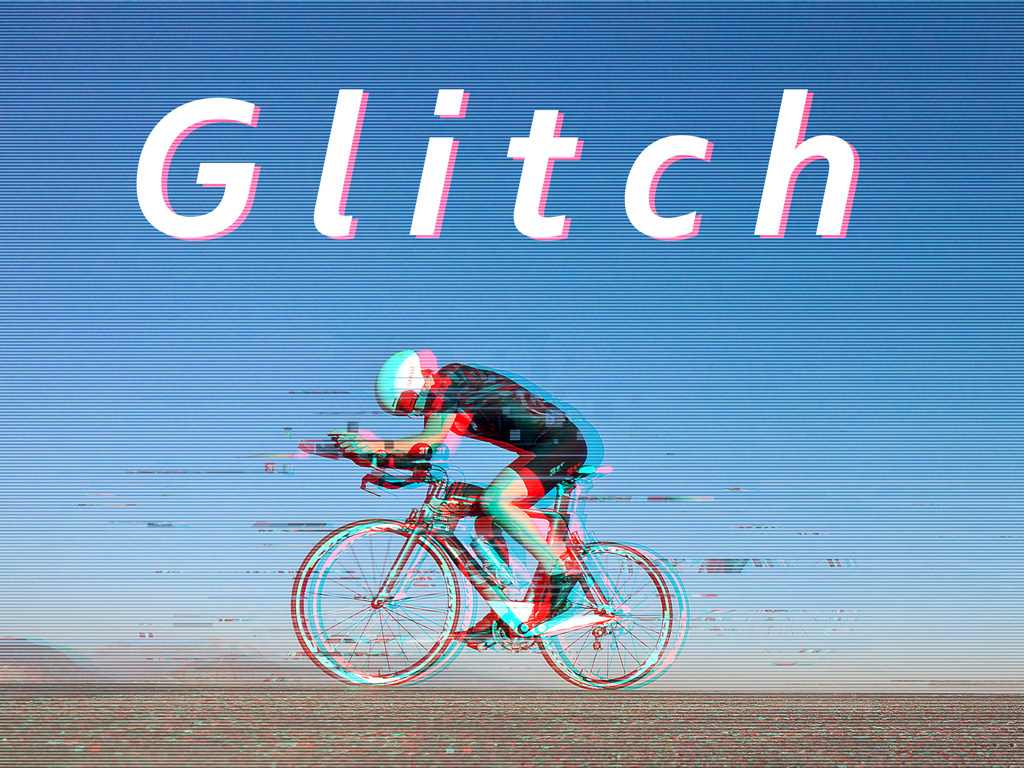
In the final step, we’ll create a glitch text using the same techniques that you have learned so far. Type a text using the Type Tool (T) as you can see I typed “Glitch” and I gave space between each character.

Duplicate this text layer and go to Blending Options to uncheck Green & Blue channels.

And I moved the layer to the right to create a glitch text effect.
Here are the final results of the tutorial:

I hope you enjoyed the tutorial. If you have any feedback on tutorial let us know in the comment section below.
Read next: How to Make Photoshop Brushes from Your Photos
Check out these recommend glitch effects for Photoshop and After Effects!


