How to Use Capture One Styles in Capture One Pro 10

Using Capture One Styles can help you speed up your workflow and find the right look more quickly. Styles are essentially preset effects and filters that you can create and save for future use.
They work very much like Lightroom Presets, but have a few key differences. Specifically, the way styles are applied and adjusted differs the most from presets.
In this article, I’ll share some tips and tricks I’ve discovered to help you work more efficiently when you use Capture One Styles.
Basic Tips
To get started, you’ll need to install some Capture One Styles. Read our tutorial on how to install Capture One Styles here.
If you need some styles to get started, we offer premium Capture One Styles here. You can also find free styles to use in our Cyber Monday Freebie.
NEW: Download the Free Matte Capture One Styles here →
Once you have some styles installed, open up Capture One Pro and import the image(s) of your choice. Navigate to the ‘Styles and Presets’ tab in the editing panel to begin editing.

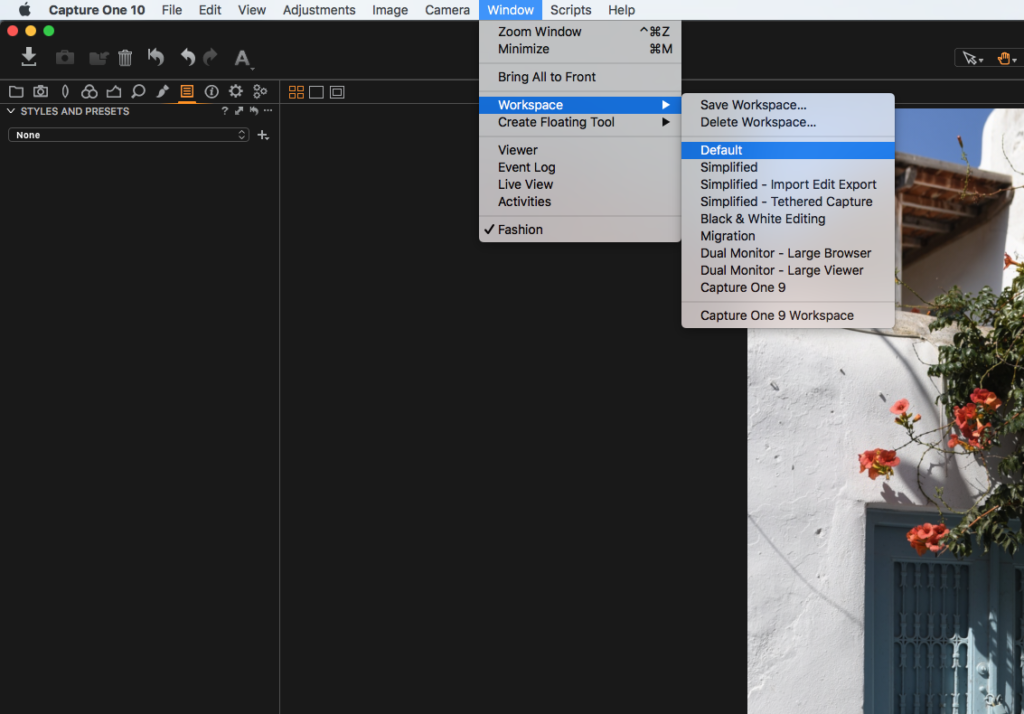
If the ‘Styles and Presets’ tab isn’t showing up for you, click Window > Workspace > ‘Default’ to reset your workspace to the standard view.
You can also click Window > Create Floating Tool > ‘Styles and Presets’ to create a floating copy of this tool. That way if you want to customize your workspace you can add the ‘Styles and Presets’ tab wherever you’d like.

Using the ‘Styles and Presets’ tab is the quickest and easiest way to start applying styles in Capture One. In just a click, you’re able to apply effects, copy adjustments, and paste these to other images in your catalog.
You can also copy/apply adjustments on an individual basis here using the ‘Adjustments Clipboard’ option. Simply right click an image in your catalog and click ‘ Copy Adjustments’ to see the settings in your panel.

Applying Capture One Styles
Now that you have an idea of where to apply styles, we’ll get right into it and share a few different methods for doing so.
The first method, and the easiest, involves applying styles directly in the ‘Styles and Presets’ tab. As mentioned before, this is the most efficient way to get started.
Simply click on the dropdown button that says ‘None’ and navigate to the style (effect) of your choice.

After clicking on the style of your choice, the effect will be applied to your image and the settings changes will be reflected in your editing panels.
You can also apply styles by clicking Adjustments > Styles > User Styles > Folders with Styles > and selecting which style you’d like to use.
This method works best if you are busy editing or adjusting in another panel and want to quickly test a style/effect on your image.

Customizing Your Capture One Styles
In order to get the most out of your styles, I recommend customizing them on a per project basis. This ensures you have the effects you need for various types of work, while keeping your downloaded (or custom created) styles intact.
An easy way to customize styles in Capture One Pro is by using the ‘Adjustments Clipboard’.
With this window open, you can apply styles and other edits to your images and then directly save them as a style in a two clicks. Simply make your adjustments in the editing panels, copy the edit to your clipboard by right clicking the image and selecting ‘Copy Adjustments’, and then click the three dots at the top of your clipboard and select ‘Save As Style’.
Immediately after clicking ‘Copy Adjustments’ you’ll see the specific settings and which edits you made in the Adjustments Clipboard. This can be a helpful reference to see which settings are turned on, and to adjust before export.

Organizing Capture One Styles
As you create and download more and more Capture One Styles, it can be hard to keep them organized. The best way I’ve found for making sense of all your filters is by creating folders based on each ‘set’ of styles.
Capture One Pro stores all of your styles in the Applications Support folder so that you can easily add and remove folders of styles here.

To remove or delete styles, click Adjustments > Styles > ‘Delete User Style’ > and then select the style(s) you’d like to remove.

Additional Tips for Capture One Styles
Here are a few additional small settings and time-saving tricks I discovered while using Capture One Styles.
- Make sure ‘Stack Styles’ is checked on. This allows you to stack multiple styles on top of each other without replacing the effect. It works great when you want to apply color effects and more minimal changes like noise, grain, etc.
- When viewing styles through the Adjustments Tab at the top of your screen, hover over each style to see what it looks like on your image before applying. This allows you to quickly view all the styles in a set without having to apply each effect.
- If you ever forget which style you’ve applied, click Adjustments > Styles > and then refer to the section that says ‘Applied Styles’ to see which styles you have on your image and remove any if you’d like.
Hope this tips helped. If you have any other questions on how to use Capture One Styles or anything else in Capture One Pro 10, feel free to leave a comment below and we’ll help you out as much as we can.


Can I change the opacity of the style? I like the styles and own a set but never use them because they are too intense.
Hi there Jacques, thanks for your comment. Unfortunately, I do not think there is a way to simply adjust the opacity like you can in Photoshop with Photoshop Actions. However; if you’d like to adjust the effect, the best way would be to edit the individual settings. Typically the Exposure, Curves, and color effects are where I start if I find a Capture One Style to be too intense. Hope this helps!