How to Use Lower Thirds in Premiere Pro
Hey everyone, welcome back to FilterGrade. Lower thirds are really helpful when you’re doing interviews or providing credit in a video. But with all of the cool animations you might see on lower thirds, you’re probably wondering how to use them. Luckily, Premiere Pro makes it super easy.
Before that though, let’s briefly talk about what lower thirds are. The name is in reference to the fact that they occupy the lower third portion of the screen in a video, although they generally don’t take up an entire third of the available space. They are generally used to introduce a person in a news broadcast or an interview. Most lower thirds will have an upper line for the person’s name, and then a lower line with smaller text for the person’s title. Lower thirds can also contain contextual information, especially if used during a news broadcast, and don’t need to be showing a person’s information. They can be as simple as just text, or they can contain graphics, animations, and transparency.
Watch the full video tutorial here:
Getting Started with Lower Thirds
You can make your own lower thirds, but we’re going to start with the easiest way, which is to use some of Premiere’s built-in templates. To access these, just go to the Essential Graphics panel. This will show you a huge library of templates available by default, and from Adobe Stock, and many of them are free. You can filter the search by free or premium as well. You can scroll through all of these assets or you can use the search bar to search for “lower third”. There are many different options with a ton of different styles to choose from. Go ahead and pick your favorite if you’re following along with the video.
When you want to use a template you can just drag it onto your timeline. It will download from Adobe Stock and import itself into your project. It will appear as a single layer, even if it appears that it’s a lot of elements all working together. Graphics from the Essential Graphics library are designed to be simple to use, so you’ll be able to easily adjust text and colors, but you may not have complete flexibility.
Select the layer, then go to the Edit tab in the Essential Graphics panel. Here you will have control over each layer, although the level of control depends on the template. For the most part, lower thirds templates are simple enough that they will have a wide degree of customization.
For text layers, you can change what the text layer says, of course, but also the font type and any properties like size, color, and line spacing. Most of the templates will conform to any size changes. After all, they’re meant to conform to different lengths of text since the text is customizable. Graphical elements like lines and shapes can also be adjusted, at least in terms of color. You can move and change the animations of all of these templates, but since you can’t see their keyframes, it can be difficult to modify. However, each template is a little bit different so you may find some that allow for more customization.
Creating a lower third from scratch isn’t that hard, though. At its most simple, you can use Premiere Pro’s text tool to create a line of text, position it to the lower section of the video, then apply a basic animation like a cross dissolve. You can add to it by putting a simple shape behind the text, and applying an animation to it that matches up with the text’s animation. This can all be done within the Essential Graphics panel rather than creating multiple layers on your timeline, that way the entire animation is contained in just one object.
Let’s showcase an example.
Open the Essential Graphics panel or the Captions & Graphics default workspace, then go to the Edit tab. Click on the text tool and click anywhere on the program monitor to start typing. You can change the font size and style here as well. You can then use the selection tool to move that text to the desired location. Then you can create a second line of text. Make sure that you still have the graphic selected and that this second line of text is within the object. If it is, you’ll see a second text layer in the Essential Graphics panel. If you don’t have it selected, then you’ll instead see a second layer on your timeline. If you keep it all in one object in the Essential Graphics panel then it will be much easier to edit later. You can change the properties of this second text layer as well. Move it into position, then open up the effects control panel.
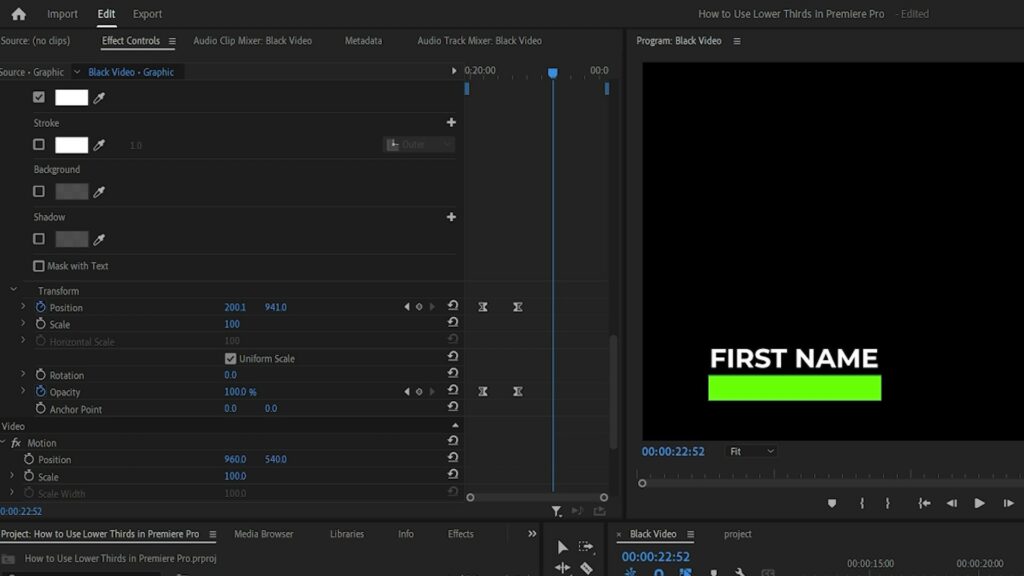
Here you’ll see the two text layers you’ve created, and you can use the normal animations controls that you would use on any other layers. You’ll see the layers as Text layers, with each one labeled according to what the text says. We’re going to create a quick animation for these two text layers so that they slide in from the left side and go from completely transparent to opaque.
To do that, we’re going to take the top text layer and create a position keyframe at its current location, then go back to the start and position it just off to the left of the screen. Now when you play the animation back, it will come in from off-screen. Now you’ll want to adjust the opacity in the same way, going from 0 to 100. You can select all of the keyframes, right-click, and select Continuous Bezier. This will create smoother animations that can help make your animation look more professional. Repeat the process for the other layer of text, except we’re going to stagger it so that the animation happens slightly delayed compared to the first line.
Now let’s add a shape layer to this animation! We’re just going to make one to cover the bottom text layer. Create a shape using the rectangle tool. You’ll need to move the layer to the bottom of the stack so it doesn’t cover anything. You can now animate it just the same as the text layers, so we’ll add some animation to it so that it comes in just before the text flies in. You can use all of the controls in the effects control panel to customize the animation in any way you see fit.
There are downsides to creating lower thirds in Premiere Pro, but they will still work. If you want the most powerful tools for creating lower thirds you’ll need After Effects. Any templates you create or modify in After Effects will be usable in Premiere Pro. Usually, these will be Motion Graphics templates or .mogrt files.
When you’re done creating your lower third, you can save it by right-clicking and selecting Export as Motion Graphics Template then saving it to your local templates folder. Give it a name, and then you’ll be able to access it at any time in the Essential Graphics panel for future projects.
Conclusion
Using lower thirds in your edits can add a lot of quality especially when it comes to interviews and news segments. If you found this tutorial helpful, leave a comment and subscribe to our YouTube channel. In the meantime, have fun creating and using lower thirds.


