How to Use Overlays and Stickers on Instagram Stories
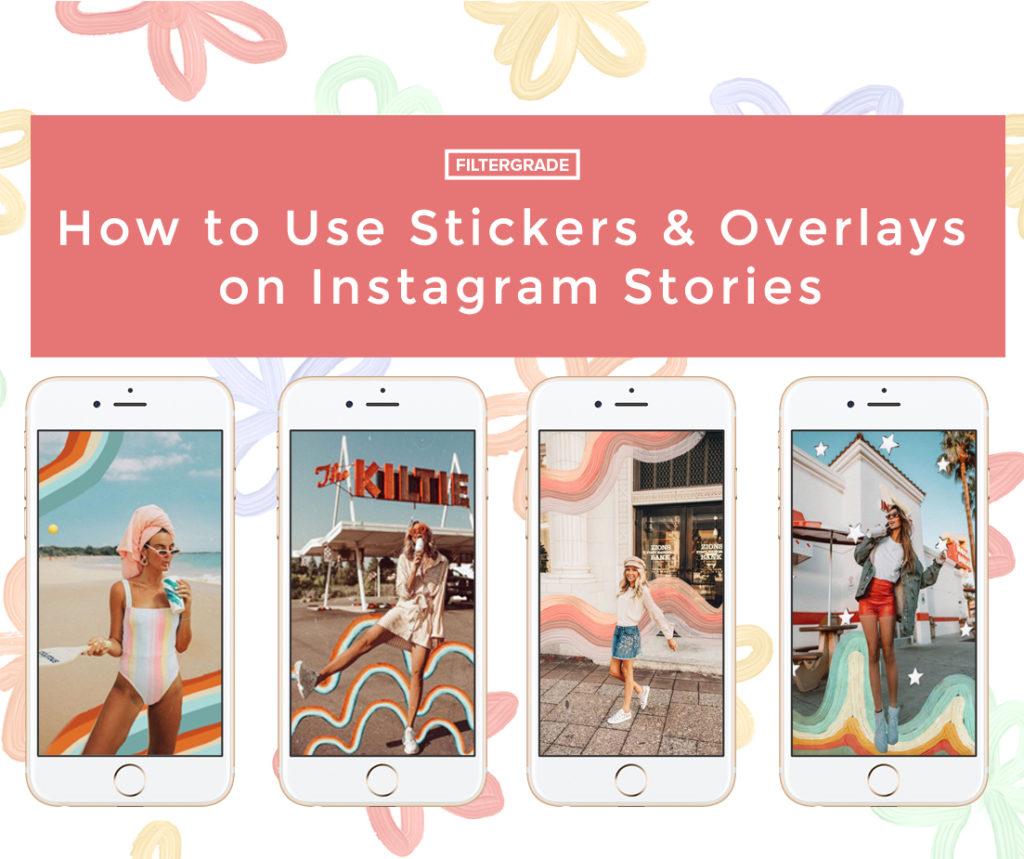
Instagram overlay stickers are trendy and fun to use. They allow you to easily add a personal touch to your posts that makes you stand out from the crowd. Technically speaking, Instagram stickers are a form of augmented reality since you’re hopefully improving the real world image with made-up designs. In layman’s terms, they help you tell your story with a stylistic flair. They can be anything and everything from animated lightning bolts and fireworks to pastel rainbows and flowers. Instagram comes with plenty of ready-to-use options built into the app. You can add music to a photo, create a poll, design a quiz, or even encourage people to vote. But, if you’re a business or you’re invested in your personal brand, simply using what’s there won’t cut it. And, that’s when pre-made sticker packs come in handy. They’re designed by professionals, so they have an undeniable aesthetic appeal, and polished look. The best part of Instagram overlays. however, is how easy they are to use. Don’t believe us? Just take a look.
Adding Instagram Overlay Stickers to Your Images

You can do this with any Instagram overlays and stickers, but if you want these fresh fun summer vibes, this pack is stunning and simply beautiful. To use Instagram overlays, you’ll need a photo-editing app, the Dropbox app (and an account!), and an app that allows you to unzip files on your phone. For photo-editing, we recommend Photoshop, Canva, or Over, and to unpack files, we suggest downloading iZip or Unzip. We’ll be using iZip and Over but anything that feels familiar to you is fine. Once you have both of these, you can begin your journey to cool, creative Instagram stories.
1. Download

When you purchased your Instagram overlay stickers, you should have received a link to download the file containing the overlays. Open up this link and use the unpacking app to unzip the files using your app and open up the link to the Dropbox files.
2. Export to Dropbox


After you’ve unzipped the original file and clicked the provided link, you’ll be taken to a Dropbox file with all of your stickers. You need a personal Dropbox, but it’s free to sign up so no sweat off your back. Just save the files to your personal Dropbox, and you’re well on your way to cool and creative Instagram stories.
3. UnZip Again

Now that the sticker files are saved in your personal Dropbox, access the Dropbox app, and export the stickers to your zipping app. We are using UnZip but anything app with these capabilities will get the job done. The app will then automatically unzip them. Save them to your phone ( we suggest a separate album for ease of use) and get ready to jazz up your photos.
4. Overlay


Now, open up your photo-editing app. It doesn’t have to be one of the ones we mentioned, but it does need to have the ability to use overlays. Upload your background image. Now, simply use one of the downloaded stickers as an overlay atop your background image. In Over, which is the app we used, you simply tap on “image” to upload another layer. You can erase the overlay in areas where you can the image to show through and adjust the opacity to further customize the look. As you can see, we even rotated one of the stickers we used.
And there you have it… Using Instagram overlay stickers is as easy as 1, 2, 3. Add as many overlays to an image as you want, but try to keep things from getting overcrowded. Play around with different overlays and editing capabilities until you find something that feels like it fits with your personal style. There’s a whole world of different styles and designs out there to experiment, this was just a slice of the pie. You can make your image moodier or add fun texts and themes to your Instagram stories. With nothing but a photo-editing app and a few minutes, you can design something polished and professional.


Paint.net is (at least in our opinion) the simplest option on the list. It still comes with a ton of powerful features like layers, adjustments, and user-created plugins, but is simple enough that complete newcomers can grasp it immediately. The features are across the top, and filters are accessible from a drop-down menu. Some of the special effects are pretty cool: sharpen, blur, distort, emboss, etc. You can even get some Instagram-esque vintage effects in there for good measure. We don’t want to waste too much time on this one. It’s got a lot of features, an easy interface, and a simple layout. If you’re struggling with others on this list, then stick with the easiest option.