How to Sharpen Your Photos in Capture One Pro 10

Adding sharpness and contrast to a photo can make a huge difference. With the right adjustments you can make your photos incredibly sharp without making them look fake or unnatural.
In this tutorial, we’re going to take a look at the various tools offered in Capture One Pro 10 to help you sharpen your photos.
If you have any questions along the way, feel free to leave a comment below and we’ll do our best to help you out. You can also learn how to install Capture One Styles in this tutorial.
1. Import Your Photos
To start you’ll want to import all the images needed for your project. To do this, select File > Import Images from the top menu.
Then a window will appear with options for how you want to import your photos. On the left, click Source then select ‘Choose Folder…‘ and find the folder of JPEG or RAW photos that you would like to sharpen.


Once you select the folder, your photos will start to show up in the Import Window. You can either choose a few select photos or import all of your images.
After your selection, click ‘Import All‘ or ‘Import X Images‘ and then your images will show up in the panel on the right.

For this tutorial, we’ll be using an image of @iamhdiddy from New York Men’s Fashion Week Summer 2016 taken by @mjmolo.

Here is a closer look at how the sharpening techniques will apply to the photo.

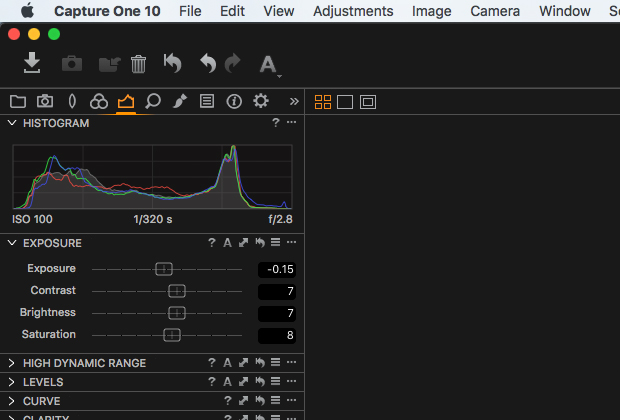
2. Adjust Exposure Settings
Our first adjustments will be to the exposure settings. To get more pronounced colors, lower the Exposure to ‘-.15‘. Then bump Contrast and Brightness up to ‘7‘ each and Saturation up to ‘8‘.
3. Clarity Settings
Next, adjust the High Dynamic Range (HDR) and Clarity settings. Change each slider to the following settings and make sure to leave the Method for Clarity set to ‘Natural‘.
Quick Note: If you want to readjust the tools in Capture One Pro 10, simply select the label (Exposure, Levels, Curve, Clarity, etc.) and drag it up or down to rearrange the order.

4. Create a Curve
A proper curve can add the perfect amount of color and contrast to an image. If you make it too sharp you’ll get really fake looking edits though. When adjusting your curve, be sure to make minor adjustments and watch how they effect your photo.
To sharpen, I usually add two points at the bottom left quadrant and the top right quadrant. Then I lift the top right and lower the bottom left points just slightly. Next I lower the top most point and I raise the bottom most point to smooth the whites and fade the blacks.
See the exact shape of the curve below.

After adjusting the Exposure, Clarity, and Curve Settings you can start to see the sharpness/vibrance more. Faded reds become bright and the details in the clothes are emphasized.

5. Add Sharpening
Finally, to get true sharpness to our image we are going to add some sharpening. Head over to the magnifying glass icon for all the Details Adjustments to find the ‘Sharpening‘ sliders.
Copy the settings below for a natural sharpened look.

6. The Final Touches
To help blend the sharpness and finish the effect add some subtle grain. Click Film Grain and then select ‘Fine Grain‘. Turn the impact up to ‘20‘.

This will smooth the sharpening and help keep your photos natural looking. Here is what the final edit will look like.

7. Additional Tips & Tricks
If the settings in this tutorial were a bit too harsh for your photo simply lower the settings. It’s very easy to overdo the curve making for a slightly unnatural look.
To add more contrast and drama, double the amount of sharpening and increase the clarity. This tends to look a little more pronounced, but works great for certain types of photos.
Finally, increase ‘Exposure‘ for a more brightened version of this effect. Keep in mind this will take a little bit of the color out of your image.

Add gorgeous fashion and editorial looks with our new Studio Fashion Capture One Styles. Perfect for runway/studio fashion photography.
Hope this tutorial helped you learn some new techniques to sharpen your photos! As always, if you have a question feel free to leave a comment below or contact us for help.


Nice writing. In particular, I appreciate your advice for sharpening. So many advise to oversharpen to death !
Thanks Tokumeino, so glad this was helpful for you!