Learn After Effects CC in 15 Minutes Tutorial (and Video)
After Effects is an intimidating Adobe Creative Cloud program with an absolute ton of potential in the visual effects, motion graphics, and compositing space. Yes, it can do a lot. But it boils down to some key interfaces, which we’re going to focus on today. After this, it shouldn’t feel so intimidating. This video will give you a great core knowledge of After Effects that will help make sense of the more complex effects the program can accomplish.
Let’s start with what After Effects is for. With some exceptions, you won’t be making a full project in After Effects. It is often used to create a composition that is a larger part of a project that you create in Premiere Pro. You may use it to create a special effects scene in a video, but not to edit the entire video. Exceptions could include any projects that are all animation.
Let’s get started . . .
Watch the video!
Open up After Effects and create a new project. Click save to give it a name and a save location.
Next, you’ll import assets from your computer. Go to File -> Import or drag in the files, just like in any other Adobe program. These files will go to your project tray.
To start creating a composition, click on the New Composition button in the center of the screen, or go to Composition -> New Composition. Set up things like width and height and frame rate to be whatever you need for your project. Or you can drag a file into the composition area to create a new composition based on the settings of that file.
The time ruler determines how long the composition is. Make sure this doesn’t go beyond where you want your composition to take place, or you’re going to have a lot of black space at the end of your final render. This can happen when you start trimming footage out of your project, so be wary of it before your final export.
MOVING FROM PREMIERE PRO TO AFTER EFFECTS
Being a video-based Adobe Creative Cloud product, After Effects shares a few things with Premiere Pro. You have the timeline, as in Premiere, but it does function differently. Keyframing is a familiar tool for Premiere Pro users, but it functions within the timeline rather than in an effects panel. Each layer on your timeline can be expanded to reveal its effects properties – each one has Transform properties by default. This also means you can have the effects panel for multiple layers open at the same time.
Keyframing works much the same as in Premiere Pro, and is an often-used skill in After Effects. Start by marking your keyframe on the property you want to change by clicking the stopwatch button, and altering the property at various intervals to animate along the timeline.
If you don’t have this skill yet, try going back to Premiere Pro and animating the scale, position, rotation, and more, of your footage, within the effects panel. Experiment with layer masks if you’re able to as well – you will use these skills all the time in After Effects, but having a base knowledge of them in Premiere Pro will help a lot.
The pen tool is also used a lot for making masks. The pen tool is common in Illustrator and Premiere Pro as well, so you may already be familiar with it.
If you have some of this prior experience in Adobe software, then you should have a much easier time getting down the basics of After Effects.
MOTION TRACKING
![]()
Motion tracking is one of the quintessential features of After Effects. This tells After Effects how your footage is moving in 3D space and allows you to use that information to sync up multiple layers into a composition that makes sense.
Start by creating a Null Object. The fastest way to do this is to right-click on your timeline and click on New, then Null Object. A Null Object is an invisible layer that can hold properties, and apply them to another layer in your composition. This is where the tracking information will be stored, and allows other layers to interact with that information.
Select the base footage that you want to track the camera movement of. On the right side of your screen you should see a Tracker button. Click that and click “track motion”. This will open up a new Layer window, but your composition will still be next to it, and you can switch over at any time. On this new layer, you will see a Track Point box appear over your footage.
Click on Edit Target to make sure the target is set to your null object.
Move the tracker around to a point in your footage that is on-screen the entire time and can act as a reference point for the tracking information. Position is checked by default, but you may also want to check rotation and scale depending on your project needs. This will create additional tracking boxes, which you will want to move to another good tracking spot.
A good tracking point should be high-contrast and as stationary as possible. The point should stay in frame the whole time.
![]()
To check the quality of your tracking points, move the timeline ahead and see if the points you chose become drastically different, and if After Effects can reliably track it. Tracking can often be difficult to get perfect the first time, so don’t worry if it takes a while to find a good tracking point. If you’re planning on using motion tracking, you can use a high-contrast marker when filming – such as making an X out of tape that can go onto an actor’s clothing or a part of the background. Then after getting motion tracking information, you would use After Effects to mask out this marker.
Now hit the play button marked Analyze, and After Effects will attempt to map out the movement in your shot.
If it didn’t work as you expected, experiment with other points until After Effects gets it right. Start by moving the playhead to where the tracker started messing up. You can keep everything that it got right, and just overwrite where it went wrong. You can also adjust the size of the tracking boxes – the exterior box gives the tracking point a wider area of analysis, so try expanding that if you’re having trouble.
Click the track button again and it will start overwriting at the point you moved to playhead to, utilizing the new bounding boxes you set for it.
Now that this information is stored in the null object, you will want to attach your relevant layer to the null object. You will want to click and hold the pick-whip, which is a swirl symbol next to each layer, on the layer that you want to move within your base video clip that you just tracked the motion of, and drag it to the null object. That layer (perhaps a text title) is attached to the null object and possesses its characteristics – in this case, the motion animation. If you play your video you will now see your text move and scale with the video you tracked.
MASKING
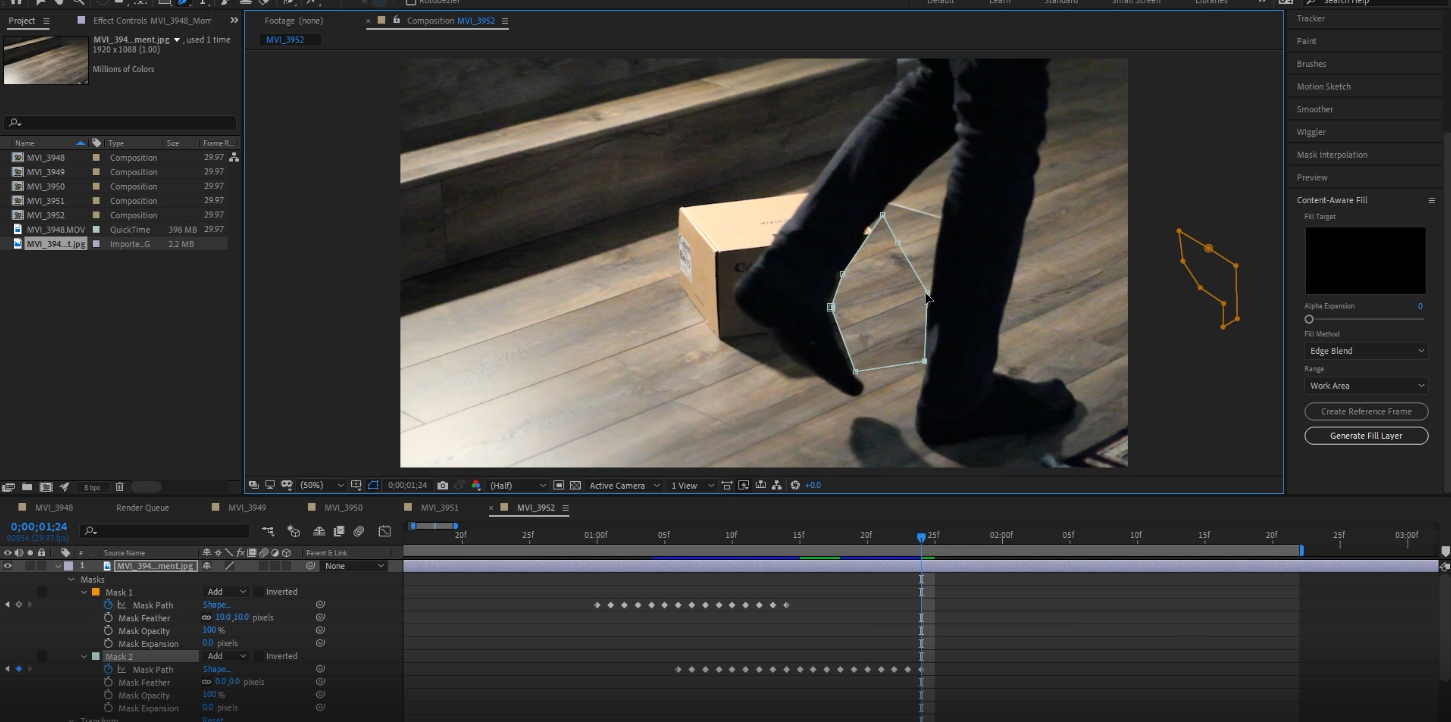
Next, we’re going to talk about masking. This is something you may already be familiar with from Premiere or Photoshop. Masking draws around an area to “mask” it in or out. That way effects can be applied to a specific area or you can put elements from one layer into another layer. Normally when you put a layer on top of another, the top layer will completely cover the bottom one. Masking allows you to erase around a subject and insert them into the layer below.
One of the most common everyday uses for masking is to get rid of unwanted objects in your scene. To do this, you will need a clean plate – basically a sample of what you want to cover the unwanted objects with. If you were planning this shot, you can take a still frame or a photo of your scene while filming, and use that as your clean plate – this should have no actors or objects in it. Alternatively, you can use masking to sample an area of your shot by duplicating the layer and selecting a clean area.
Drag in your clean plate over your footage. Then reduce the opacity so that you can see the bottom footage, and use the pen tool to mask around the rough area you want the objects removed from. When you’ve made your mask, set the opacity back to normal and you will see that the mask has covered the problem area!
By default, masks are set to “Add” meaning that it only keeps whatever is within the bounds of your mask, and removes everything else. You can delve into your layer’s properties to see the mask details, and change the mask mode, depending on what exactly you’re doing. For example, if you’re masking out something rather than masking it in, you would use subtract. You can also have multiple masks on the same layer, each with their own independent properties.
To animate your mask, you can use the timeline to create keyframes. This is useful, for example, if your actor walks in front of the object you’re trying to mask out. With the current way the mask is set up, the mask will go over the actor and it won’t look good at all. Open up the properties of your mask, select the frame right before the mask covers your actor, and set a keyframe. This will be your starting point. Now start moving frame by frame, and adjusting the mask so that it masks what it needs to mask. Create additional masks as needed, following the same guidelines for animating them. To make the masks look more natural, you may want to slightly increase the feather. This creates a smoother transition between layers and reduces hard edges.
If your background is moving rather than stationary, the same rules apply, but it will take a lot longer to manually mask this. You may also want to make use of the motion tracking that we covered earlier, to animate your mask along the path of the objects you’re looking to alter.
The process of manually masking is also referred to as rotoscoping, after the original tool used to do this kind of process by hand in the earlier ages of film.
PRE-COMPOSING
Pre-composing is a simple but useful tool for using projects as templates. If you have a project like a logo animation and want to be able to switch out the logo but keep the animation the same, right-click on the logo and click Pre-Compose. Rename it, select to Keep All Settings In Footage, and open up this new composition. Now you will see a box with your current logo in it. Now you can drag in a new logo, make it fit within the bounds of the box, hide the old logo, then go back to your main composition and see that the logo has been replaced but has all of the same properties as the old one.
This is a non-destructive way to use compositions as templates in After Effects, and may end up saving you a lot of time.
EXPORTING

Exporting your project in After Effects is somewhat different than in Premiere Pro. Go to File -> Export. You’ll see a few options, and none of them just say “Export” like you may expect from other Adobe products.
You can select Add to Render Queue, which renders within After Effects, or you can select Add to Adobe Media Encoder Queue, which will use Media Encoder, and is recommended. Remember, this will render the area selected with your time ruler. That means it will cut off anything that isn’t within those bounds, and will add black space if there is no footage within those bounds.
Once Media Encoder is open, click on the format to select what format you want to export as. If you’ve used Media Encoder with Premiere Pro, you will recognize this interface. Select the format, export settings, and output name, then click OK and export your file from Media Encoder.
CONCLUSION
That is After Effects in under 20 minutes. There is plenty more to learn, but these core concepts and examples should give you a great starting point. These are the basic aspects of the program and the ones you will utilize basically no matter what you’re trying to accomplish. Make sure to like and subscribe and let us know in the comments what in-depth After Effects tutorials you want to see in the future.


