The Basics of Blender 2.9 Tutorial
Blender is an awesome 3D modeling tool, and the best part is that it’s free. In this video, we’re going to cover the basics of Blender, including how to set up a project, add elements to it, and ultimately render your 3D art.
To start, go to the Blender website, download Blender, and install it on your computer. It might be easier to follow this tutorial with Blender open – pause the video often to make sure you understand each concept. With so many tools, buttons, and options, it’s easy to get lost.
Watch the video tutorial
When you first open Blender, it will open a splash screen with some options. For this basics tutorial, you can just click on the screen outside of this menu, or just click General under New File.
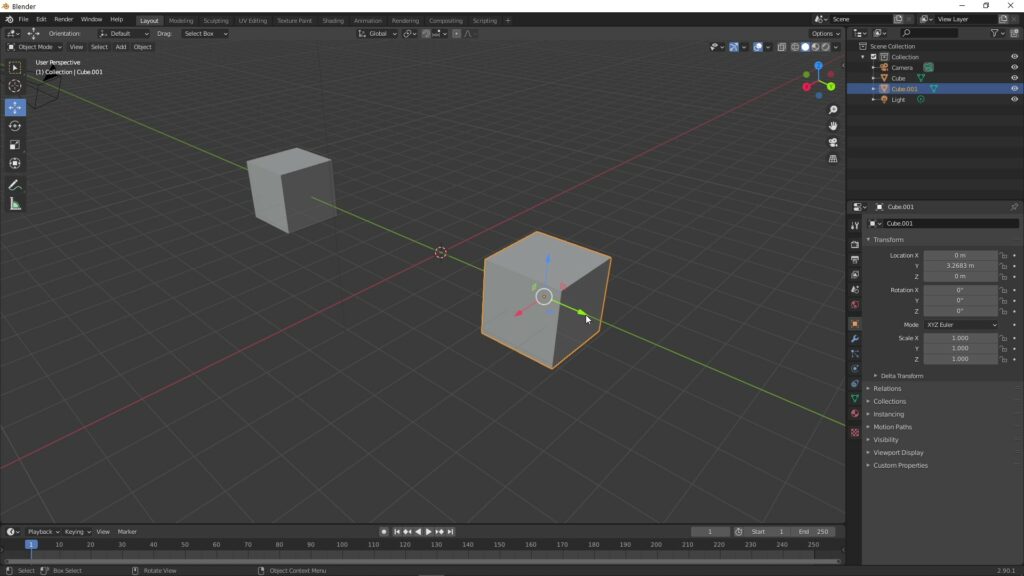
Here you’ll see the basics of any Blender project. A 3D grid plane with a cube, a camera, and a light source. You can see these objects in the scene collection. Let’s first talk about controls, which you will use to view your project from different angles. Hold down the middle mouse button or scrollwheel on your mouse and move your mouse, to rotate around the cube. If you don’t have a three-button mouse, go to Edit > Preferences, and select Emulate Three-Button Mouse. Now you can hold the Alt key while clicking and dragging with left mouse button. A third option still, is the 3D thumbnail in the top right corner of the project. You can click and drag in this to orbit around your scene. You can also use the scrollwheel to zoom in and out. Otherwise, you can use the plus and minus keys on your number pad to zoom. Or, click and drag the magnifying glass symbol on the top-right of the project. To pan around your scene, press the shift key and hold the middle mouse button and drag. If you don’t have a middle mouse button, then you can hold Shift and Alt while clicking and dragging with left mouse button. You can also click on and drag the hand symbol in the top-right of the object. The last view option is perspective versus orthographic. Switch between these by clicking on the grid symbol in the top right of the project or by pressing the 5 key on your number pad. Perspective view shows objects as they would look in real life, with farther away objects being smaller and closer objects being larger. Orthographic view shows all objects as their actual size.
Now let’s start actually working with objects in Blender!
To select an existing object, such as the cube, just left-click on it in your project view. You’ll know it’s selected because it will highlight in orange. Just like in other programs, you can select multiple objects by holding shift while individually clicking objects. You can also select objects from the scene collection, but to select multiple you need to use the Ctrl key rather than Shift. You can also hide layers by clicking the eyeball symbol next to them. This doesn’t delete them, but just makes them invisible until you turn the layer back on. To actually delete a layer, select it, right-click, and select Delete, or just press the Delete key on your keyboard.
Now let’s make some stuff. To add an object, hold the Shift key and press A, and a menu will pop up. You can also just click the Add button at the top of the project. In the Mesh menu, you’ll find all of the basic shapes like cubes, circles, cones, and more. Click on one to create it, and it will add to the project. The point at which the object is added is determined by the location of the 3D cursor. If you’d like to move the 3D cursor, you can hold shift and click with the right mouse button, or use the 3D cursor button on the left side of the screen. Now when you select a new object, it will center itself on this point. To return to the original center point, press Shift and C.
Now let’s use the move tool to change the location of an object. To activate the move tool, you can click on it from the left side toolbar. Select the object, and three colored arrows will appear. You can drag along these lines to move the object on the X, Y, and Z axes. Red is the X-axis, green is the Y-axis, and blue is the Z-axis. To move the object in a more freeform way, you can press G with the object selected, and move your mouse to change the position in 3D space. Left-click to confirm the location. If you want to move along an axis while in this mode, press the X, Y, or Z key on your keyboard to lock the object onto the corresponding axis.
Next up is rotating the object. Select the rotate tool from the toolbar on the left side of the screen. You’ll see red, green, and blue circles around the object that signify the axes of rotation. Note how the main axis lines go straight through the center of their corresponding circles. Rotating an object on a certain axis means that you’re essentially putting it on a stick and spinning it. When you move your mouse over these circles, they will highlight and then you’ll be able to click and drag to rotate. You can also press R to rotate and left-click to confirm. Just like with moving, you can press X, Y, or Z on your keyboard to snap to an axis.
The next basic tool is the scale tool. It is also located on the toolbar on the left side of the screen. The colored axis bars will show up again. Dragging these will shrink or grow the object along that axis only, and it will do so equally in both directions from center. You can also press the S key on your keyboard to use the scale tool, and left-click to confirm, while using the X, Y, and Z keys to scale only on the select axis.
The final common tool is the Transform tool, which combines all three of the previous tools into one interface with the same controls.
To reset an object to its original settings, hold Alt while pressing the corresponding shortcut key. G for position, R for rotate, and S for scale.
This was object mode, but now we can move to edit mode. To change modes, use the dropdown on the top-left of the project, or press Tab on your keyboard.
You’ll notice first of all that the object now has vertices, and there are additional tools in the lefthand toolbar.
Selection modes are important in this view, and you can change between vertex select, edge select, and face select. Vertex select will highlight a single corner, edge select will highlight an entire line between two vertices, and face select will select an entire shape enclosed by at least three vertices.
You can change the position, scale, and rotation of any of these selections using the same tools as before.
Now let’s use some of the new tools.
The first one is Extrude. This tool extrudes your selection. Click and drag the yellow line to extrude an edge or a face. Just left click to finalize a position. The extrude shortcut is E on your keyboard.
The next tool is Inset. This doesn’t physically change a face, but it does give you more to work with by creating extra faces. It essentially creates a small shape in the middle of the existing shape, using existing vertices to draw new faces. You can use I on your keyboard to access this tool, as well.
Finally we have Bevel. To use this on a plane, click and drag the yellow line, and the shape will bevel. To change the settings of how the Bevel tool works, click on the Bevel menu in the bottom left corner. You’ll be able to adjust the number of segments as well as other features, if you’re trying to achieve a specific look. With Bevel selected, you can use Ctrl + B on your keyboard to activate it, then move your mouse to drag it. While doing this, you can also use the scroll wheel to add segments. Left click to confirm your bevel.
The Loop Cut tool is a cutting tool that can cut a shape in half along an axis. Once you see your preview, just click to confirm. This does not actually cut an object into two, but it does create lines that separate the object into new planes. If you don’t want it in the center, you can slide by clicking and dragging the mouse.
Let’s take a look at putting colors and textures onto our boring grey shapes. To work with color, first switch the view mode from Solid mode to Material mode, found as icons in the top right of the screen. Now click on the Material Properties button on the right toolbar, and click on Base Color to bring up the color wheel. Now you can change the color and your object will change to reflect that. If you’re working in solid mode, the color will not show up. Now what if you want to only color a specific face? Go back to edit mode, select a face with face selection, then click on the plus button on the Material Properties window. Click on Assign, and it will give that face its own material property. Now you can select a different color for this face in the same way we colored the whole object previously.
Next we’ll look at how to view your object as a more realistic final render. Start by creating a new mesh plane and arranging it so that the object is sitting on it. This will help us visualize the scene better. Click on the small dropdown arrow in the top-right, next to the different view types. Uncheck the Scene World box and you’ll be able to select some world boxes. Increase the opacity to be able to see them. These will not show up in your final render, but they can help you visualize what your object might look like in a larger scene. Entering Render view will render your light sources, giving a final realistic look at your scene. While we’re here, you can click on your light source and adjust things like power, color, and more. If you need a new light source, just click on Add, and select a light source, then move it to the desired position and angle.
The last thing we need to do to render our scene is to add a camera. There is one by default, but if you want to add a new one, just go to Add and click on Camera. You can move and rotate it using the normal controls. To enter camera view, just click on the camera icon on the right side, and click again to exit it. This will show the view of the camera, and you’ll be able to render after finalizing your focal length and other settings. Now click on render properties from the right-hand sidebar, and choose your render engine. Eevee is faster but lower quality, and cycles is slower but higher quality. It’s a little more complicated than that, but the differences are beyond the scope of this video. Once you’ve selected your render engine, click on Render, then Render Image. This will open up the Blender Renderer, and process the image. The render time will depend on the complexity of the scene and the power of your hardware. Once the render is complete, click on Image, Save As, and select a location. Now you’ll have a 2D image file of your scene, as seen through the Blender camera!
Blender is a deep and complex program, but these basics should give you enough to mess around inside the program and hopefully learn through your own experience. If not, there are some awesome tutorials out there by talented artists! Make sure to like this video if it was helpful to you, and comment down below what you want to see from us next.


Nice video with lots of info
Nice One – All Basics Cleared
Must for Beginners
I’ve got this question…..I just ordered the 3.3 program, and I’m stuck. I mean how do I get to the inter-face to start learning how to do all of this? There are so many programs on the first page, that it would take me a whole day or 2 days to learn what they have in this program. For most of the day I’ve been in Introduction-Blender manual. Could someone please help me.
thanks you !
This is a pretty good tutorial for absolute begginers. Thank you!
So glad this was helpful, and thanks a ton for the comment Dinara!