10 Tips for Adobe After Effects Beginners

Congratulations you’ve decided to start using, Adobe After Effects, one of the most powerful and versatile video manipulation tools in the industry. When you first open After Effects up it can seem a little daunting. There are so many options, buttons and work areas – you may look at everything and be overwhelmed, and that’s ok. To make this a little easier for you we are going to show you 10 tips for Adobe After Effects Beginners. A quick note this walkthrough is based on After Effects on a PC. On a Mac, shortcuts may be slightly different.

1. LEARN THE LAYOUT
When you first open After Effects it will ask you if you want to open previous projects or create a new project. Select new project. Once you do this, the standard After Effects screen should open up and you’ll see grey panels. The panels will have a different configuration depending on what workspace layout you are looking at. For this discussion, and to make sure we are talking about the same layout, I’ll walk you through how to get to the standard layout configuration.
At the top of your After Effects screen, you’ll see the menu dropdown buttons.

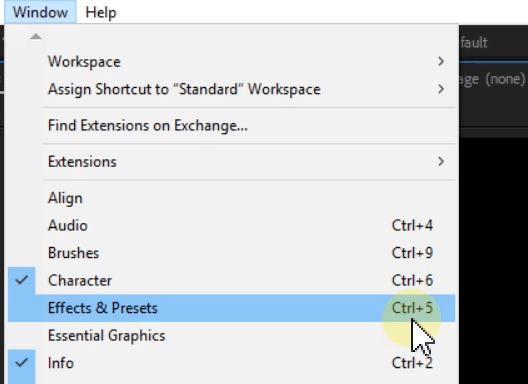
Click on the drop-down button titled “Window”. Once you do that a grey drop-down box of options will show. Here is where you can turn on and off panels as you need them or go to a default panel setup. Click on the “Workspace” tab on the dropdown and this will open up another set of dropdown items. These are your default workspace configurations. As you learn After Effects you’ll find that different layouts will work better for certain situations than others. For this demonstration select the “Standard Layout”

Now you should see an area similar to the above image. The Project Panel is where you’ll see all the elements you have to work within a project. Including any compositions, you have made. When you imported objects into your project they will show up here. At the bottom, you’ll have your timeline. This area will populate with items once you have a composition created and you have elements imported into your timeline. When you do have elements in your timeline you’ll see video from your timeline in the composition menu above it. To select and do different things in After Effects you’ll have to make sure you have the right tool selected. The most common tool you’ll need is the selection tool. You can get this tool by hitting the “V” button on your keyboard. Or you can find it at the front of the tools panel area. Some tools will be greyed out if they are not an option at the moment. The Panels can be moved around and dragged to different areas to help you make different configurations. If you do move them around but want to go back to the default workspace then do what you did when we first started. Select “Windows” from the drop menu. Then select workspace followed by “Standard Layout” If it doesn’t change back then select “Reset Standard Layout” which is a few options below.
2. PROJECTS VS COMPOSITIONS
If this is a new project and you haven’t saved it or titled it you should do that now. You can select “Save as” under the “File” drop-down menu. Or if you’ve saved it before you can just hit “Save” When you first save it will ask you the name and where you want to save it. It’s important that you keep organized with where you save and keep your items. Once you named it, this will be your project name. A project consist of imported elements and compositions. If you are familiar with editing software, a composition is equivalent to a sequence. To create a comp / composition you just need to select the “Composition” drop-down on top and select new. When you do this it will ask you for the details of your composition (The size, Frame Rate, duration)
3. IMPORTING ELEMENTS AND BRINGING INTO TIMELINE
To import an element such as video and images into After Effects you can select “File” then “Import” from the drop-down menus or hit “CTRL”+”I”.
4. USING THE TIMELINE
Moving around the timeline can be a little intimidating but pretty easy once you understand the basics of it. Make sure you have your selection tool selected. You can do this by hitting the ‘V’ button. This following video will walk you through using the timeline.
5. SCALE, SIZE, MOVE
It’s pretty easy to change these Transform properties for layers in the Timeline. Click on the small triangle pointing right on the layer you want to affect in the timeline. This will make a drop-down of options. Select the arrow next to Transform to give you more options. Here scale, position and other items can be affected by changing the number values.
6. HOW TO USE KEY FRAMES
If you do change a scale size or position value on your timeline you may want it to change over time. In your timeline find the starting position of your change. And hit the stopwatch icon next to the layer to set the starting value. Then move your timeline to the ending position of the effect. Change the value again and this should add a second keyframe. You can see an example of how to do this here.
7. ADDING TEXT
Adding text is pretty easy to do in After Effects. In the tool panel select the Horizontal Type Tool represented by the “T” icon. Now click in the area of the composition you’d like to type. To adjust size and font you can do that in the Character Panel. If you don’t see the character panel you can get to it by hitting “CTRL” button plus “6” at same time. To adjust multiple sentences in a paragraph you can do that in the Paragraph panel. This can be brought up by hitting “CTRL” button plus 7.

8. USING EFFECTS
One of the most fun things to do in After Effects to apply effects to your elements and layers. And it’s pretty easy to do. To open up Effects panel if you don’t already have it open hit “CTRL”+”5”.
9. ANIMATION PRESETS
After effects is filled with tons of Animation presets to make your job a little easier. They are very effective for adding animation to text and other layers.
10. SHORTCUTS
The more you start to do repetitive things in After Effects you’ll want to find quicker ways to achieve the task. Shortcuts are the best way to do this. As you move around After Effects and select items in the drop-downs you may have noticed that the short cut keys are listed next to various items you may be selecting.
Learning those shortcuts will speed up your editing workflow. Here are some standard shortcuts:
- A – Anchor Point
- P – Position
- S – Scale
- R – Rotation
- T – Opacity
- V – Selection Tool
- “+””-“ – When on Timeline zoom
- “CTRL” + “S” – Save
So there you have it, 10 tips for Adobe After Effects Beginners. After Effects gets easier each time you use it. Don’t feel like you have to learn everything right away. Another way to learn more is to use pre-made templates like those found in the FilterGrade library. Learn some basics and have fun.


