How to Install and Use LUTs in Premiere Pro

Using LUTs can be helpful when color grading footage in Premiere Pro. With lookup tables, you are able to get a good color base and can build from that point to grade your entire project. I usually like to edit clip by clip to account for light/color inconsistencies.
In this tutorial, I will be covering the basics of how to install and use LUTs in Premiere Pro. There are two main methods for doing so. The first, which involves inputting LUTs individually, makes it easy to add a LUT to your video quickly. The second method, which involves copying the LUT files to another folder, takes a little longer, but has some key benefits. Your LUTs will be added to Premiere Pro permanently following this method allowing you to quickly load any LUT that you have already copied into Premiere.
More on that below, first learn how to use LUTs in Premiere Pro quickly through the Lumetri Color Panel.
1. Import Footage
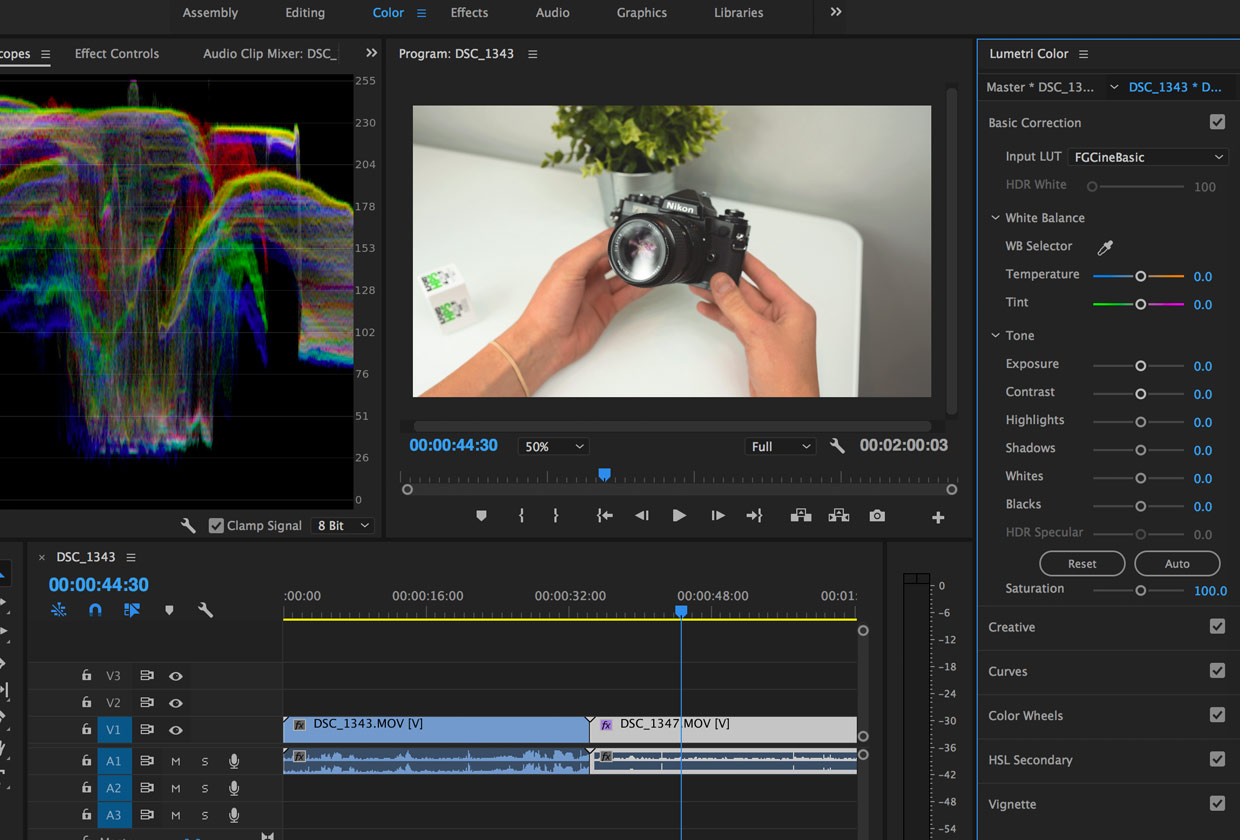
Start by importing your videos or open a recent project. Once you have your clips ready to go, navigate to the Color Tab and look for Basic Correction.

2. Input Custom LUTs
In the Basic Correction section, you’ll see a button titled ‘Input LUT’ with the clickable word ‘None’ next to it. Click this button and then click Browse.

Clicking ‘Browse’ will open up your folders. Navigate to the desired LUT you downloaded to apply it to your clip. I will be using these free cinematic LUTs for this project.
Once applied, you can see the effects of the LUT on your footage. You’ll also see the color waveforms change in your Lumetri Scopes tab to give you an idea of how the LUT affects your clip.
From here you can adjust the White Balance, Tone, Highlights/Shadows, and more to get your clip just right.
Copying LUTs into Premiere Pro
If you want to add LUTs to Premiere Pro permanently so you can just select them rather than look them up within your folders, you can do that too. Here are the steps to do so on a Mac. I’ve included the files paths for both Mac and PC below.
2019 Update from Adobe
Special thanks to Wes Howell from Adobe for the insightful comment. Below are the updated and recommended instructions for adding multiple LUTs in Adobe Premiere Pro 12.1:
“Basically, you create new shared folders for the LUTs and then you can simply add your LUTs to them.”
Custom LUT directories
Available only to the local user
Create LUTs folder and then 2 folders within that folder at the following location:
Per user directory:
Mac Users
/Users//Library/Application Support/Adobe/Common/LUTs/Creative
/Users//Library/Application Support/Adobe/Common/LUTs/Technical
Windows Users
C:\Users\\AppData\Roaming\Adobe\Common\LUTs\Creative
C:\Users\\AppData\Roaming\Adobe\Common\LUTs\Technical
Or use these directories if you’d like to make LUTs available to all users
Mac Users
/Library/Application Support/Adobe/Common/LUTs/Creative
/Library/Application Support/Adobe/Common/LUTs/Technical
Windows Users
C:\Program Files\Adobe\Common\LUTs\Creative
C:\Program Files\Adobe\Common\LUTs\Technical
5. Apply pre-loaded LUTs from the Lumetri Color Tab in Premiere.

If your LUTs are not showing up when you try to load one from the dropdown, make sure you are under ‘Creative’. The pre-loaded LUTs show up in the Creative section of Lumetri Color, not the Basic Correction section.
This gives you the added benefit of being able to adjust the intensity of your LUT making it less or more intense from the current state.

File Paths for Premiere Pro LUTs
Mac: /Library/Application Support/Adobe/Common/LUTs/Creative
PC: C:\Program Files\Adobe\Common\LUTs\Creative
Video Tutorial: How to Import/Apply LUTs in Premiere Pro
Hope this article was able to help you use LUTs in Premiere Pro! If you have a question about any of the steps or run into errors/issues, feel free to leave a comment below and we’ll do our best to help you out.
More Premiere Pro Tutorials
Find more tutorials and resources for learning about editing videos with Premiere Pro.
-
How to Delete Audio in Premiere Pro →
-
Using the Auto Save Feature in Premiere Pro →
-
14 Great Sites to Learn Video Editing →
-
10 Professional LUTs Packs for Filmmaking →
-
View all Premiere Pro Presets →


I keep getting the response “a low level exception occurred”
Hmm, is this when importing the LUTs? I looked into this error and only saw it for certain camera profiles. Most of the articles mentioned restarting Premiere or refreshing the render cache and media cache. More info from Adobe here.
I have a premiere pro cs6 and there’s no Lumetri folder in the directory. Help me please
Hi Olukayode, check out this video for more: https://www.youtube.com/watch?v=ScvZ1kud9kE
You can open LUTs directly in the Basic Correction tab under Color. Click the ‘input LUT’ button and then import your LUT individually on each clip. Hope this helps.
This was not a feature included in CS6.
Hey Mike,
in CS 6 (as Olukayode uses) there is no such thing as Lumetri… Think you missd the important part of his question…
@ Olukayode: maybe you gotta do the same as I (seem) to have to do… using Davinci Resolve for the LUTs – at least the .cube ones – and Export from Premiere to DaVinci and back….
But looking for a direct usage in Premiere CS6 as well… If I find a solution, I’ll write it here.
Thanks, your post is amaizing.
appreciate the support jj, cheers!
The way you describe adding multiple LUTs can actually cause a lot of problems. I realize that you may not have been aware of this when you created the tutorial. Just pointing it out.
Why? The problems come especially when working with others or with multiple systems as the order of the LUTs might be different in other systems causing unexpected behavior.
With that said, Adobe has developed a new feature for adding multiple LUTs with 12.1. Go here: https://helpx.adobe.com/premiere-pro/using/whats-new.html Look for the section, “Lumetri Color Custom LUT directory” to set it up. It’s very simple.
Basically, you create folders for the LUTs and just drag them in. That way, you can avoid hacking into the app package, which is not approved by Adobe. Full disclosure, I work in Adobe Support for digital video software.
Custom LUT directories
Available only to the local user
Mac
/Users//Library/Application Support/Adobe/Common/LUTs/Creative
/Users//Library/Application Support/Adobe/Common/LUTs/Technical
WIN
C:\Users\\AppData\Roaming\Adobe\Common\LUTs\Creative
C:\Users\\AppData\Roaming\Adobe\Common\LUTs\Technical
Available to all users
Mac
/Library/Application Support/Adobe/Common/LUTs/Creative
/Library/Application Support/Adobe/Common/LUTs/Technical
WIN
C:\Program Files\Adobe\Common\LUTs\Creative
C:\Program Files\Adobe\Common\LUTs\Technical
Thanks!
Brilliant Kevin. Thanks for your advice and comments both here and on Youtube, we really appreciate it!
My pleasure!
I have LUT presets and after updating to the latest adobe premier pro, I can’t see the luts in the software when I’m colour grading. When you say create a folder and drag them in, where exactly do you drag them into? Hope you can help me with this. Thank you!
Awesome post! I just did this and it worked on great (CC 2017). Kevin, is there a way to do this in-app procedure for CC 2017 without hacking into package contents, or is that just for CC 2018? CC 2018 is still absurdly buggy so I’m not touching it for a good long while…
Ben,
This is a feature of 12.1, so it won’t work with 12.0 or earlier. You can avoid hacking package contents, but you have to add LUTs one at a time with the Browse function. Not ideal but at least you will have reliable results and not that crazy behavior where your LUTs are out of order. 12.1.2 is working pretty well for me, actually. You just have to watch out for those old QT 32 files!
thank you very much
very help to me this post
Thank you for the support, glad we could help!
This page really should be updated to remove the recommendations to hack the application directory. It is not supported and unfortunately, it has caused a lot of problems for users.
The new workflow provides a better experience and eliminates many bad bugs. Can you please consider updating the page?
Many thanks,
Wes Howell
Adobe Systems
Hi Wes,
Are you referring to the section about copying LUTs into Premiere Pro through the application folders? How is this considered hacking?
Can you elaborate on the new workflow? Would be happy to update this article to make things easier for Premiere Pro users.
Thanks,
Mike Moloney
Founder of FilterGrade
Wes is an engineer for the application, so he is referring to tampering with the app package, which should not be done by users, in general. In other words, just because you can do something, does not mean you should. Basically, it can cause unexpected behavior with LUTs, etc.
Hi Mike,
Thanks for the reply. It’s not a supported workflow and modifying package contents is generally not a good idea. :). Thank you for your offer to help clear this up. It seriously will eliminate many issues for users.
Adobe developed a new feature for adding multiple LUTs with 12.1.
Basically, you create new shared folders for the LUTs and then you can simply add your LUTs to them.
Custom LUT directories
Available only to the local user
Create LUTs folder and then 2 folders within that folder at the following location:
Per user directory:
Mac
/Users//Library/Application Support/Adobe/Common/LUTs/Creative
/Users//Library/Application Support/Adobe/Common/LUTs/Technical
WIN
C:\Users\\AppData\Roaming\Adobe\Common\LUTs\Creative
C:\Users\\AppData\Roaming\Adobe\Common\LUTs\Technical
Or use these directories if you’d like to make LUTs available to all users
Mac
/Library/Application Support/Adobe/Common/LUTs/Creative
/Library/Application Support/Adobe/Common/LUTs/Technical
WIN
C:\Program Files\Adobe\Common\LUTs\Creative
C:\Program Files\Adobe\Common\LUTs\Technical
Please let me know if you need any further info or clarification. Happy to lend a hand.
Thank you very much.
Wes Howell
Adobe
Can this work with Premier CS6?
Thanks
Unfortunately I don’t think Premiere Pro CS6 had the same support for LUTs that the CC versions do with Lumetri. Red Giant used to support a product called LUT Buddy, but I think it is discontinued. You can read more here: https://support.redgiant.com/hc/en-us/articles/230764087-Where-is-LUT-Buddy-
Hope this helps.